Adobe Sign for Research Administrators
Please note, NIH’s May 2025 deadline for migration to using SciENcv in biosketches is postponed.
For details about this postponement see this Update.
To comply with federal certification and signature requirements, and to align with Duke IT security standards, Duke research administration is transitioning to Adobe Sign for obtaining electronic signatures on all Other Support and Previous/Current/Pending Support (OS/PCPS) documents. Effective January 1, 2023, signatures for DoD and NIH OS/PCPS documents may only be obtained using Adobe Sign through a Duke Adobe Sign license.
- NSF does not require electronic signatures to accompany certifications on fillable forms for Current & Pending documents and Biosketches. Therefore, Adobe Sign is not needed for NSF proposals.
Benefits of Adobe Sign include:
- Obtaining signatures is all accomplished online. Investigators can access the document via email and will not need any additional software or license to be able to review and sign the document.
- The platform sends automated reminders for unsigned documents and provides a dashboard to view the status of pending documents to help with document management.
- Duke Adobe Sign provides an audit report for each document identifying who generated, opened, forwarded, and signed the document to provide proof to sponsors, if needed, that the investigator reviewed and signed the document and did not have a delegate sign on their behalf.
Please note: Adobe Sign is a separate platform from Adobe Reader or Adobe Pro. Having access to other Adobe products does not provide access to Adobe Sign.
Requesting an Adobe Sign account
For Campus Schools and Provost Area research administrators:
- Access Adobe Sign on the Duke Software Licensing site
- Select the "Add to cart" button under the Adobe Sign product
- Select the "Checkout" button
- On the checkout screen:
- Contact information should be checked thoroughly
- Select "University" for the Area at Duke field.
- Important: type in "Request is for an RA account" in the "Order instructions" field. This alerts OIT to expedite approval for the account. If this step is not done, extra layers of approval for getting access to the account may be required.
- An email from Adobe Sign will be sent when the account has been created.
For Schools of Medicine and Nursing research administrators:
- Complete the Adobe Sign Research Administration Account Request form.
- The form will route to central offices for approval. Once approved DHTS will create the Adobe Sign account.
- An email from DHTS will be sent when the account has been created. This may take up to 10 days from the request.
How to utilize Adobe Sign for obtaining electronic signatures
Below are the steps for setting up the PDF file in Adobe Sign and routing for electronic signature(s). A learning module is also available to walk new users through the steps.
Please note: For OS/PCPS documents, wait until ORA/ORS have reviewed the OS/PCPS document before routing for signatures. This way if there are any edits, you do not need to get the document signed twice.
| 1. | Use your NetID and password to log in to your Duke Adobe Sign account | For university staff: log in here For for Duke Health staff: log in here |
| 2. | Select the “Request e-signatures" button |  |
| 3. | Enter the Duke email address(es) for whom you need the signature in the “Enter recipient email address” field | |
| 4. | Enter a descriptive name for the document to be signed in the “Agreement Name” field. Brief instructions will auto-populate based on the “Agreement Name.” You can edit these. It may be helpful to include a reminder about using the "Type" or "Draw" option to apply the signature. |  |
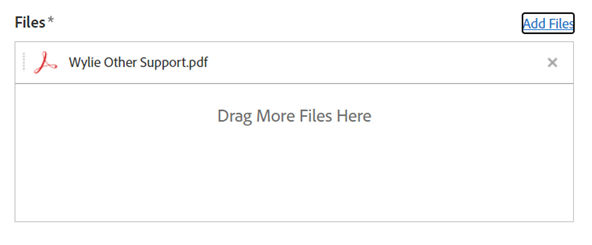
| 5. | Add the PDF file to be signed in the “Files” field. You can either drag and drop the file or select “Add File” to search for the file on your computer. |  |
| 6. | Select the button for “Preview and Add Signature Fields” and then select “Next” |  |
| 7. | This should take you to a screen that displays the uploaded PDF file. Scroll to the section where there is a line for the signature and date of signature. |  |
| 8. | In the right-hand navigation menu, expand the “Signature Fields” accordion and drag and drop the “Signature” option onto the signature line in the document. |  |
| 9. | In the right-hand navigation menu, expand the “Signer Info Fields” accordion and drag and drop other fields, as needed, onto the corresponding place in the document. |  |
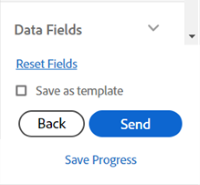
| 10. | Press the “Send” button located at the bottom of the right-hand navigation menu to route the file to the email address(s) entered in step 3. |  |
How to access signed documents
When the document has been signed, Adobe Sign will email the user who uploaded it. Within that email is a link to access the document online. Alternatively, access to the document is available when a user is logged in to their Duke Adobe Sign account by:
- Selecting the “Manage” tab
- In the left-hand “STATUS” navigation menu, selecting “Completed”
- Hover over the title of the document in question, and select “Open”
How to download signed documents and the associated audit report
- Follow steps 1-3 above to access signed documents, and ensure that the document in question has the appropriate signature(s) and date(s).
- In the right-hand “Actions” navigation menu, select “Download PDF.” Note: If the download does not appear at the bottom of the screen or in the "Downloads" folder of the desktop, check to see if pop-up blockers may be disabling the download.
- In the right-hand “Actions” navigation menu, select “Download Audit Report.” This is the audit trail of the document that shows all dates, actions, email addresses, and IP addresses associated with the creation and signing of the document. This serves as proof that the document was signed by the intended investigator and was not forwarded to anyone to sign on their behalf.
- For Other Support/Current and Pending documents:
- Save both the signed document and the audit report to a folder that can be easily identified and located in Duke Box.
- Please note: saving signed documents to Box is critical for those with Duke Health Adobe Sign accounts as documents are only retained in Adobe Sign for 30 days.
- The audit report does not need to be submitted with the Other Support/Current and Pending document but should be securely stored (Duke Box) and on hand in the event that the sponsor or institution needs to access the audit trail of the document.
- Ensure that the final, signed PDF is flattened before submitting to the sponsor.
Instructions for recipients (those needing to sign the document)
The recipient does not need an Adobe Sign account to be able to sign the document. Once the document has been routed for signature, the recipient should receive an email from Adobe Acrobat Sign.
- In the email, click on the document name or “Review and Sign”
- Click the highlight “Click here to sign” box to apply a signature.
- Use the "Type" or "Draw" option to apply the signature, as these will add additional information to the signature (name and date) to indicate that this has been electronically signed. Refrain from using the "Image" option as this does not add the electronic signature indicators and may look like a wet signature that is not in compliance with sponsor guidelines.
- Select the “Click to Sign” button located at the bottom of the screen.
Acceptable signatures from external collaborators
OS/PCPS documents for those outside of Duke are not required to use Adobe Sign (this is a Duke policy, not a sponsor policy) but the signatures should be electronic signatures and not appear as a wet signature.